Just-In-Time Provisioning in WSO2 Identity Server

Just in time provisioning (JIT) is provisioning users to the Identity Server when user tries to log into an application through federated IDP such as Google, Facebook, GitHub, etc. Before look into JIT provisioning, let’s get a brief idea about provisioning types available in the WSO2 Identity Server provisioning framework.
- Inbound provisioning: Inbound provisioning is about, provisioning users or groups in to the WSO2 Identity Server by an external application/service providers. Inbound provisioning requests can come in the form of SCIM or SOAP. For more information, see Inbound provisioning
- Just-in-time provisioning: Just-in-time (JIT) provisioning is about how to provision users to the Identity Server at the time of federated authentication.
- Outbound provisioning: Outbound provisioning is about provisioning users to a trusted identity provider (ex:- Google, Salesforce, etc) from the WSO2 Identity Server. All the provisioning requests will be initiated by a service provider and will be provisioned to all the identity providers configured in the outbound provisioning configuration of the corresponding service provider. For more information, see Outbound provisioning.
Just-in-time Provisioning is…
As shown in the above image, when the service provider initiates the authentication request, the user redirects to the identity server, and the identity server redirects to the external identity provider for federated authentication. At that point, if the identity server receives a successful response from federated IDP, just in time provision will happen. Therefore the user will be provisioned to the internal userstore with the user claims received from the authentication response. With the JIT provisioning, user creation is possible during the authentication flow where you do not require to create user accounts beforehand.
Simply, if a new user is added to your application, you do not require to create the user account manually, as JIT provisioning will automatically create the user account on successful federated authentication.
In the WSO2 Identity Server, JIT provisioning is configured with the federated Identity provider configurations that I will explain in this blog. Therefore, you will be able to configure outbound authentication in the service provider with JIT provisioned enabled federated IDP. Then the user from the external IDP will be provisioned to the specified internal userstore.
JIT provisioning options
In WSO2 IS JIT provisioning configurations, you will be able to select one of the following options along with the internal userstore that you want to provision the federated users.
- Prompt for username, password, and consent
With this option, after federated login, you will be asked the preferred username and password for the account that is going to be provisioned along with the consent for user account provisioning.
- Prompt for password and consent
A password for the provisioned user account will be asked if you select this option, along with the consent before provisioning the federated user account.
- Prompt for consent
The user account will be provisioned with an auto-generated password and unique value from IDP claims as username, while only asking the consent before provisioning the federated user account.
- Provision silently
If you select, provisioning silent option, the federated user will not know that a user account will be provisioned to an internal userstore of the Identity Server. In this step also user account will be provisioned with a unique value from IDP claims as a username and an auto-generated password. In all these options, a set of claims from IDP side will also be set to the provisioned user account.
Configure JIT provisioning for federated Identity provider
Now it’s time to see, how this JIT provisioning happens in WSO2 identity Server. First let’s configure federated identity provider with JIT provisioning.
- Start WSO2 Identity Server and access the Management Console via
https://localhost:9443/carbon/. - Navigate to the Main menu to access the Identity menu. Click Add under Identity Providers.
- Click the Main tab on the Management Console, navigate to Identity Providers under the Identity menu, and then click Add.
- Provide the required information for the added identity provider.
- Then expand and provide the required information for the selected federated authenticator.
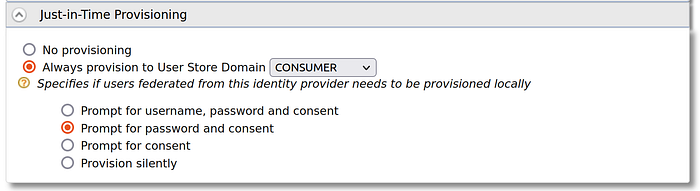
- Expand the Just-In-Time Provisioning section and select the JIT provisioning options based on your requirement. As explained above, based on your use case, you can select one from the available four options. Also as shown in the following image, either you can select PRIMARY userstore or you can select any internal userstore from the list of your userstores that you want to provision the federated users. Moreover, if you need to disable JIT provisioning, you can simply select the “No Provisioning” option.
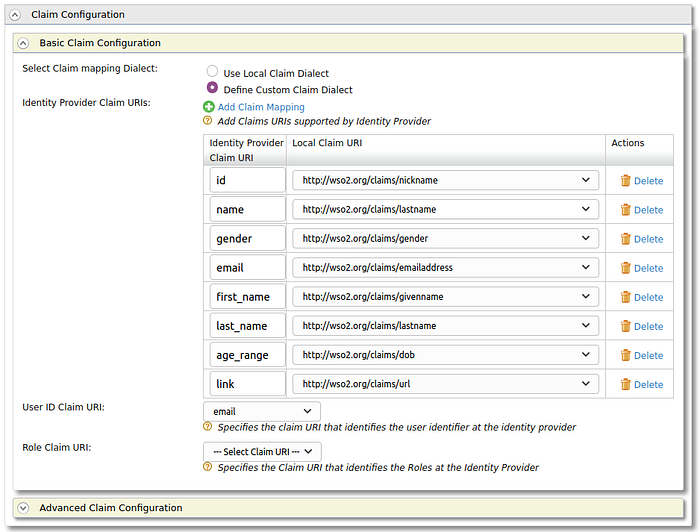
7. As an optional step, we can configure claims in the Identity Server and map them with claims from the federated identity provider. So we can enrich the provisioned user account with the claims from the federated IDP. For that, please follow the below steps.
- Under Claim Configuration, go to Basic Claim Configuration.
- Select the Define Custom Claim Dialect option under Select Claim mapping Dialect and then click Add Claim Mapping. The following screen will be displayed.
- Now add custom claim mappings as follows and map these attributes to any Local Claim URI that is suitable.
- From the receiving claims, you can select one claim as the user identifier for that particular identity provider. You can configure this through User ID Claim URI . So the configured user identifier will be the username of the JIT provisioned user.
8. Click Register to add the identity provider.
9. Then navigate to the service provider configurations and register a new service provider. Check here for details.
10. Then expand Local & Outbound Authentication Configuration and choose Federated Authentication, you need to select the identity provider that you have configured from the drop-down list.
11. Update the service provider configurations and try to log in to the registered application
12. You will be asked to authenticate through the configured identity provider.
13. After successful login, based on the JIT provisioning option that you have selected, your experience may differ as previously explained in the “JIT Provisioning option” section.
14. In the Management console navigate to the Users section, now you will be able to see the provisioned user account with the user claims from the federated IDP.
Furthermore, when handling consent for JIT provisioning, you may need to configure consent purposes and required user attributes to acquire user consent while JIT provisioning according to your requirement. From here, you can get to know how to configure JIT provisioning consent purposes and required user attributes via the WSO2 Identity Server management console.
JIT Provisioning Enhanced Feature
With the latest JIT provisioning feature, you can enable the JIT provisioning enhanced feature(This is not available in WSO2 IS 5.11.0, but available in the latest product) by adding the following config to deployment.toml file which is in <IS-HOME>/repository/conf directory.
[authentication.jit_provisioning] enable_enhanced_feature = "true"With the JIT provisioned enhanced feature, the following capabilities will be available.
- A Federated unique user id will be set as the username of the JIT provisioned user if you select one from the last three options from JIT provisioning configurations.
- Second-factor authenticators(Ex:- TOTP, Email OTP) will be able to configure for federated users when JIT provisioning is enabled.
- When an IDP is deleted, all provisioned users from that IDP will be deleted.
- Editing JIT provisioned user’s attributes will not be allowed as user attributes will be synced from each federated IDP login.
- Ability to lock JIT-provisioned user accounts based on social identity.
For more details:
- If you like to watch a quick demonstration of this JIT provisioning flow, you can check the Just-In-Time (JIT) Provisioning with the WSO2 Identity Server video from the #Identityin15 video series.
- You can check WSO2 documentation regarding configuring Just-In-Time provisioning for an Identity Provider from here.
- The JIT provisioning post-authentication handler implementation can be found here.
Hope you now have a better understanding of what Just-in-time provisioning is and how you can configure JIT provisioning with WSO2 Identity Server 😇. Happy reading!!!
