Integrate Facebook with WSO2 Identity Server
Nowadays all almost all of us have a Facebook account. So if we can log in to an application with our Facebook credentials other than using separate user IDs and passwords, it will make our life easier. WSO2 identity server has the capability to allow users to log into the applications with Facebook credentials.
Through this blog, I will guide you on how to integrate the WSO2 Identity Server with Facebook via configuring the Facebook developer app.
Let’s configure the Facebook app…
First, we need to configure the Facebook developer app. For that go to https://developers.facebook.com/apps/ and log in with your Facebook credentials and follow the bellow instructions
- Click on Create App and select the App type that you require and add the App Display Name and Contact Email, and then click Create App ID.

2. On Add Products to Your App page, click Set up under Facebook Login.

3. Select Website as the platform for the app used in this sample.

4. Enter https://localhost:9443/ as the Site URL (If you have configured WSO2 IS running on IP or hostname, you need to provide the configured IP or hostname) and click Save.

5. Under Products on the left navigation panel, Click Facebook Login -> Settings.
6. You can configure the Client OAuth Settings on the window that appears.
- Set Client OAuth Login to Yes.
- Set Web OAuth Login to Yes.
- Valid OAuth redirect URIs - Enter the Assertion Consumer URL (
https://localhost:9443/commonauth)
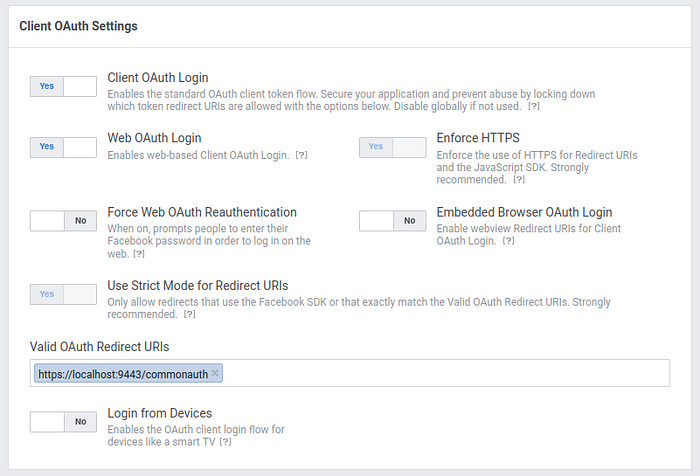
7. Scroll down and click Save Changes button to save the changes.
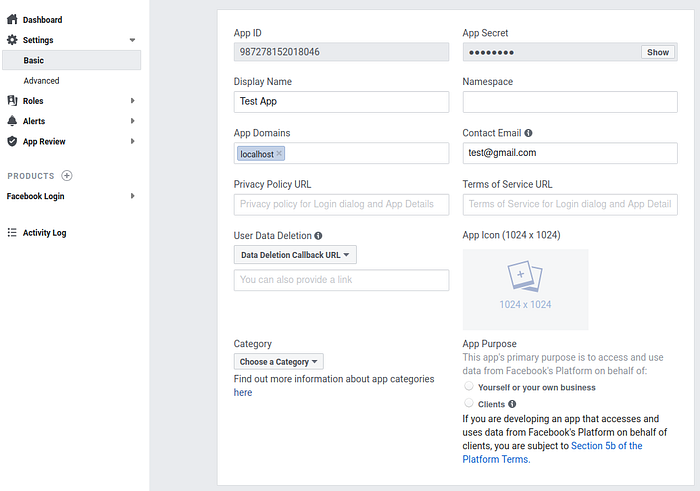
8. Click on Settings > Basic. You can see the App ID and App Secret as shown in the image below. Click Show to view the App Secret.
- App ID is the Client ID
- App Secret is the Client Secret
- App Domains since WSO2 IS is running on localhost, you can add localhost as the App Domain
Note!!! To make the configured app available to public you have to submit the app for review. Since this review process take some time, you can add some Facebook users as testers by adding those users via Roles sections in the left navigation menu of the dashboard.
Now we are done with configuring Facebook developer app.
Configure sample application
The next step is to configure the a sample app in order to use in this scenario. Refer to Deploying the Sample App for the instruction on deploying and configuring travelocity sample application.
Once this is done, the next step is to configure the WSO2 Identity Server by adding a service provider and identity provider.
Configuring the identity provider
Follow the steps given below to add Facebook as a new identity provider in the WSO2 Identity Server.
- Download the WSO2 Identity Server from here and run it.
Log in to the Management Console as administrator. - In the Identity section under the Main tab of the Management Console, click Add under Identity Providers.
- Give a suitable name(Ex:- Facebook) as the Identity Provider Name.
- Go to Facebook Configuration under Federated Authenticators.
- Enter the following values in the form that appears:
- Client Id — Application ID of the Facebook App
- Client Secret — App Secret of the Facebook App
- Scope — email
- User Information Fields — id,name,gender,email,first_name,last_name,age_range,link
- Callback Url — https://localhost:9443/commonauth
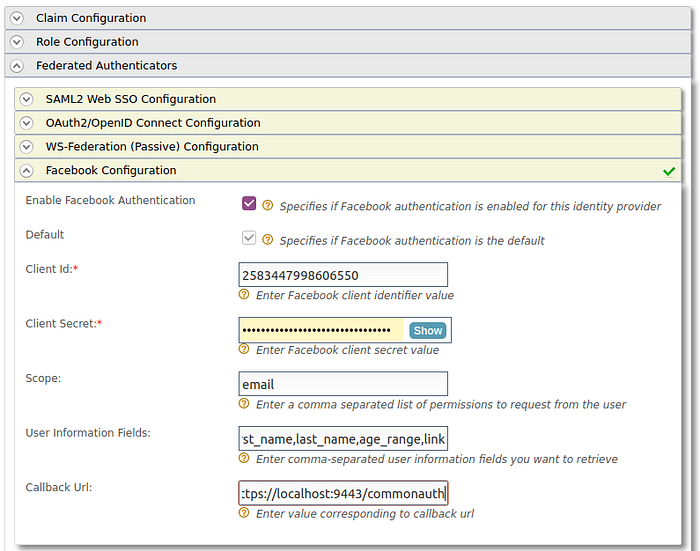
6. Select both checkboxes to Enable Facebook Authenticator and make it the Default.
7. As an optional step, we can configure claims in the Identity Server and map them with Facebook. For that, please follow the bellow steps.
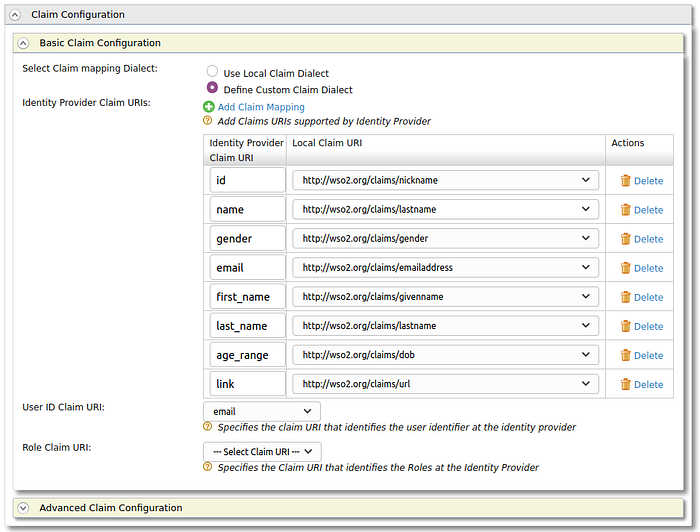
- Under Claim Configuration, go to Basic Claim Configuration.
- Select the Define Custom Claim Dialect option under Select Claim mapping Dialect and then click Add Claim Mapping. The following screen will be displayed.
- Now add custom claim mappings as follows and also you can map these attributes to any Local Claim URI that is suitable.From the receiving claims, you can select one claim as the user identifier for that particular identity provider. You can configure this through User ID Claim URI (e.g., email).
8. Click Update to save changes.
You have now successfully added the identity provider.
Configuring the service provider
Next… we can configure the service provider.
- Please refer this to configure travelocity service provider’s Inbound Authentication Configuration.
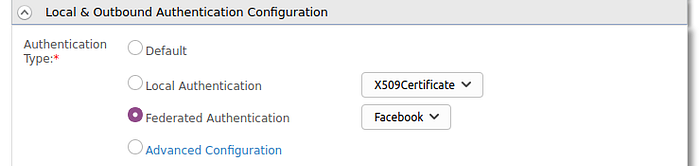
- Then go to the Local and Outbound Authentication Configuration section.
- Select the Federated Authentication radio button and select the Identity Provider that you have created from the dropdown list under Federated Authentication.
- Optionally, we can configure the necessary claims on the service provider side since the service providers may need some information from the Identity Provider side after the authentication process in order to provide their service.For that follow the below steps:
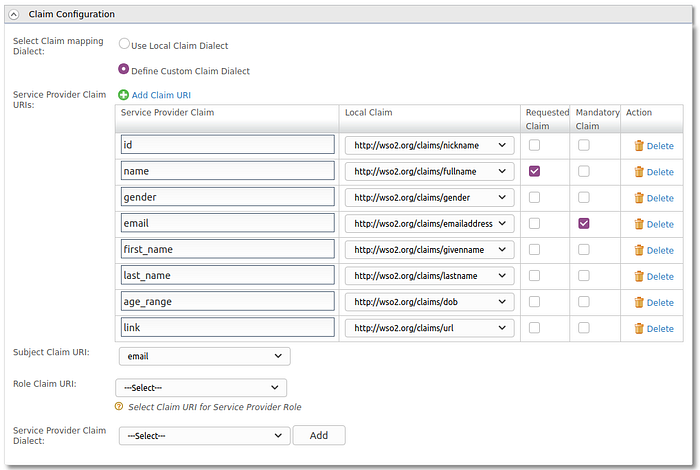
- Go to Claim Configuration under SP configurations and click on Add Claim URI under Requested Claims to add the requested claims as follows. Here you should add the claims you mapped in the Identity Provider claim configuration. Select the Mandatory Claim checkbox for any claims that are mandatory.
- The SP can request claims from IDP by adding those as “ Requested Claims” to be used after authentication process.
- Select a suitable claim for the Subject Claim URI to uniquely identify a service provider.
5. Click Update to save changes.
Now you have configured the Identity Server.
Finally….
- To test the sample, go to the following URL:
http://localhost/travelocity.com. - You will be redirected to the Facebook Login page. Enter your Facebook credentials and then you will be taken to the home page of the travelocity.com app.
We are done!!!! Now you know how to successfully integrate WSO2 identity Server with Facebook to have federated authentication for the configured applications.
